
Gather Squeak Repair Kit and Drill
From How to Use a Squeak-Repair Kit on Carpeted Stairs and Floors · Step 2 of 6 · Video by LRN2DIY
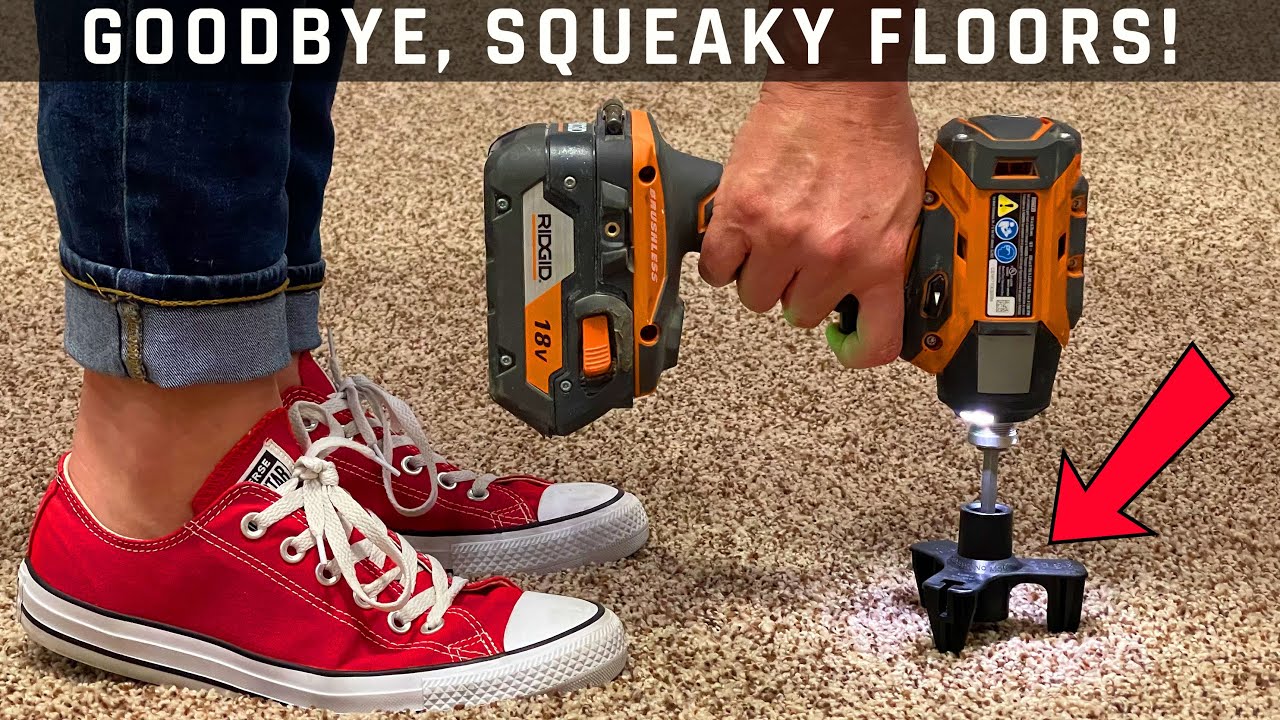
Showing 1:00–1:37 of the source video. Watch the full video with every moment.
What happens in this clip
Acquire a 'Squeeeek No More' kit, which includes specialized screws, a tripod jig for carpeted floors, and a drill bit with a depth collar. You will also need a power drill or impact driver. The kit's screws are designed with a weak point above the threads, allowing their heads to snap off cleanly after installation.
Goal: Prepare the specialized tools and screws for the repair process.
What's used
Tools
- Drill Bit with Depth Collar Squeeeek No More
- Power Drill Rigid
- Specialized Screws Squeeeek No More
- Squeeeek No More Kit Squeeeek No More
- a tripod jig for carpet
- and a drill bit with a depth collar for squeak repair.
- Tripod Jig Squeeeek No More
About the full video
This project provides a step-by-step guide on how to fix squeaky floors from above, using a specialized kit. The process involves identifying the direction of floor joists, locating the exact joist position, driving special screws to secure the subfloor to the joists, and then snapping off the screw heads for a flush finish. The video also briefly covers how to adapt the method for non-carpeted floors.
What's said in this clip
running right here and right here. Once you've identified that, I'm going to use this kit here called Squeak No More. I've been using this one for years for different squeaks throughout the house, and I can vouch for this. It works really well. Now, this kit has everything that you need to fix the squeaky floor with the exception of one item, and that is a drill. One kit, one drill, and you're ready to go. Now, these screws are special screws. As you can see, there's a little weak point right here above the threads, and that's where these things will actually snap right off, which is part of the genius of this system. It will actually drive down into your carpet and into your floor, hold the floor together the way we want it to, and then you snap the head right off. Now, in my case, I've
Automatically transcribed from the source video.
Step 2 of 6: Prepare the Squeak Repair Kit
Most squeak repair kits contain specialized screws designed to bridge the gap between carpet and subfloor, and often include a drill bit sized for these screws. Familiarize yourself with all the parts included in your specific kit and carefully review the manufacturer's instructions. This ensures you understand how each component is intended to be used.
Every video in How to Use a Squeak-Repair Kit on Carpeted Stairs and Floors
Step 1: Identify Squeak Location
- 0:00–0:17 Identify Squeak Location
- 0:00–0:09 Locate the Squeak
- 0:00–0:30 Locate Squeak and Assess Access
Step 2: Prepare the Squeak Repair Kit
- 1:00–1:37 Gather Squeak Repair Kit and Drill (this video)
- 0:13–0:54 Inspect the Squeak No More Kit Components
- 2:56–3:11 Prepare Specialized Squeak Eliminating Screw Kit
Step 3: Drill Pilot Holes
- 0:15–0:24 Drill a Pilot Hole
- 4:17–5:45 Fix from Above: Use Trim Head Screws
- 4:08–4:43 Pre-Drill Pilot Holes
Step 4: Install Repair Screws
- 1:25–3:50 Install Specialized Repair Screws
- 2:56–3:28 Install Breakaway Repair Screws
- 2:48–3:49 Drive and Snap Off the Screw
Step 5: Break Off Screw Heads (if applicable)
- 3:48–4:38 Break Off the Screw Head
- 4:49–5:22 Snap Off Screw Heads
- 3:50–4:00 Break Off Screw Heads
Step 6: Test the Repaired Area
- 8:01–8:29 Test Repaired Floor
- 3:57–4:25 Repeat for All Squeaky Areas
- 0:38–0:48 Confirm Repair and Concealment
Questions about How to Use a Squeak-Repair Kit on Carpeted Stairs and Floors
What kind of drill is best for this project, especially when working through carpet?
A cordless drill with good torque, like the DEWALT 20V MAX, is ideal for portability and power. Ensure it has a variable speed trigger for precise control when starting pilot holes through carpet. Using the correct drill bit size for your kit is crucial to avoid damaging the carpet or subfloor.
What should I do if the squeak isn't completely gone after installing the repair screws?
First, re-confirm the exact source of the squeak by applying pressure. Sometimes multiple screws are needed, or the squeak might be coming from a slightly different spot. Try adding more screws around the area, spacing them a few inches apart, or slightly adjusting their position. If it persists, the issue might be deeper, requiring professional assessment.
Are there any safety precautions I should take when drilling through carpet into the floor?
Always wear safety glasses to protect your eyes from debris. Be cautious of what might be directly underneath your subfloor, such as electrical wiring, plumbing, or heating ducts. While unlikely to hit these directly with the short screws, it's good practice to drill carefully and know your home's layout if possible. Use a sharp drill bit to minimize carpet snags.
How accurate is the 3-hour time estimate for a beginner doing this project?
The 3-hour estimate is reasonable for addressing a few squeaks in a confined area, like a set of stairs. The most time-consuming part is often accurately pinpointing the squeak. If you have many squeaks across a large floor area, or encounter very hard subflooring, the project could take longer.
What if I accidentally hit a nail or something hard while drilling a pilot hole?
If your drill bit encounters significant resistance or stops abruptly, you've likely hit a nail or another obstruction. Do not force the drill. Try moving your pilot hole a half-inch or so in any direction. If you suspect an obstruction is structural or a utility line, stop immediately and assess the situation before proceeding.
How to Use a Squeak-Repair Kit on Carpeted Stairs and Floors
Outline for using a squeak-repair kit on carpeted stairs and floors to eliminate annoying squeaking sounds.
Read the full guide Browse all guides
Planning this project? Shop Oak Valley Designs.

Subscribe for exclusive updates
Be the first to know about promotions, new products, and sales.