
Calculate Final Total Rise
From How to Measure Basement Stairs with Uneven Steps · Step 6 of 6 · Video by stairbuilding
Showing 0:54–1:25 of the source video. Watch the full video with every moment.
What happens in this clip
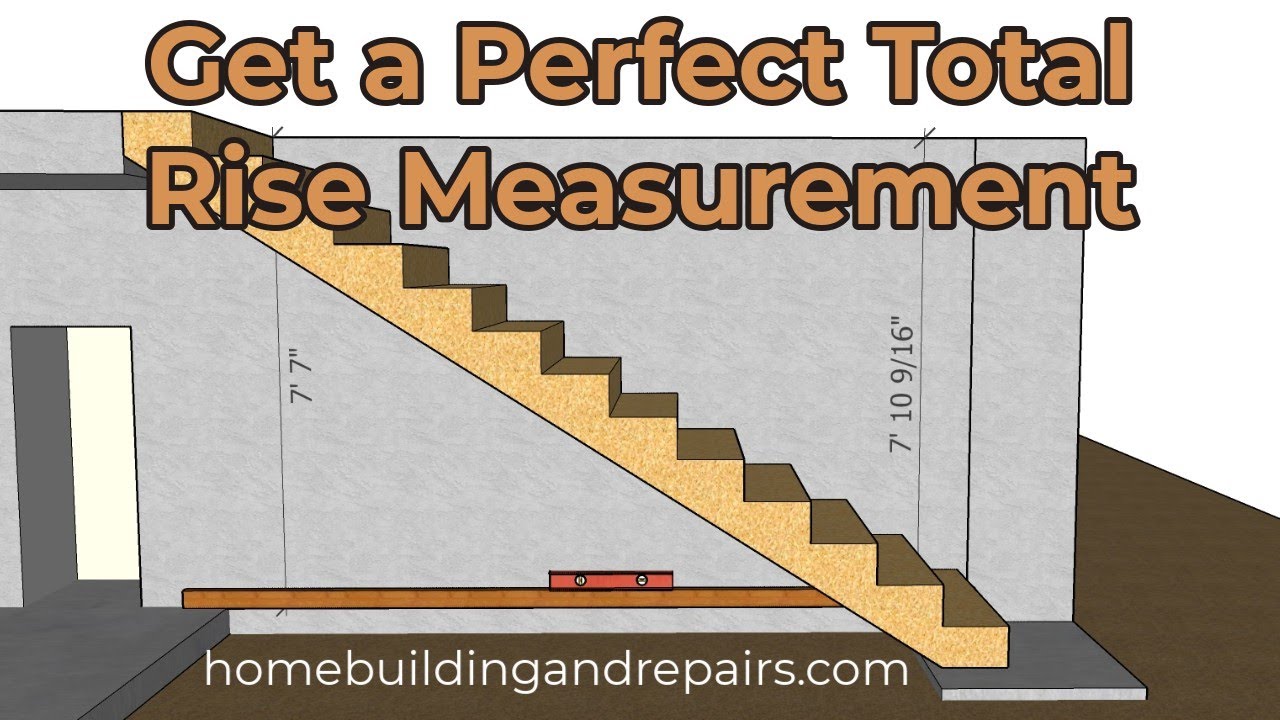
Once the true level horizontal line is established (as described in the previous step), measure the vertical distance from this level line down to the actual finished surface of the lower landing or ground where the stairs will terminate. Compare this measurement to what a direct measurement might have been. If there's a difference between the level line's height at the lower termination point and the actual lower landing height, subtract or add that difference to ensure your total rise measurement is precise. For example, if the lower landing is 2 inches lower than the level line's projection, add 2 inches to the initial vertical measurement from the level line to the upper landing. This correctly adjusted total rise is then used to calculate the individual riser and tread dimensions needed for accurate stair stringer layout and eventual cutting.
Goal: Measure vertically from the established level line down to the lower landing and adjust the initial measurement by subtracting or adding the difference to obtain the accurate total rise.
What's used
Tools
- Measuring Tape
About the full video
This video demonstrates a crucial preliminary step for stair stringer installation: accurately measuring the total vertical rise between two levels. It highlights common pitfalls of incorrect measurement due to uneven ground or landings and provides a method to establish a true level line for precise calculations before any cutting is done. Note: This video focuses solely on the measurement aspect and does not include instructions on cutting stair stringers with a circular saw or any other tool.
What's said in this clip
a nice level line on the wall that you can measure from. That way if the landing is too high you're going to know about it and be able to make the adjustments or if it's lower you're going to be able to make the adjustments and you can simply make the adjustments by measuring from either the top or the bottom of a straight edge like a 2 by 4 and then subtract or add the difference to this measurement here to get the overall total rise. You need to calculate the individual risers so that you can lay out your stringer correctly. And thanks for watching.
Automatically transcribed from the source video.
Step 6 of 6: Document All Measurements
Consolidate all the measurements taken in the previous steps (individual rises, individual runs, plumb/level checks, total rise, total run) into a single document or spreadsheet. Clearly label each measurement with the step number or location. This organized data will be essential for determining the extent of the unevenness, identifying problem steps, and planning the most effective repair or leveling strategy.
Every video in How to Measure Basement Stairs with Uneven Steps
Step 1: Inspect the Stairs for Visible Unevenness
Step 2: Measure the Rise of Each Step
Step 3: Measure the Run of Each Step
- 0:00–0:03 Measure Individual Stair Components
- 2:54–4:47 Measure Straight Stairs
- 0:52–2:34 Measuring Rise and Run
Step 4: Check for Plumb and Level of Treads and Risers
- 0:19–0:51 Level and Align Installed Riser
- 2:22–2:42 Diagnose Stair Fit Problems and Causes
- 12:00–14:21 Check Tread Level and Stringer Fit
Step 5: Measure Overall Staircase Dimensions
- 0:04–0:28 Measure Total Rise
- 1:05–3:09 Determine Staircase Dimensions
- 0:04–0:30 Measure Total Rise
Step 6: Document All Measurements
- 0:01–0:28 Measure Total Vertical Rise
- 0:54–1:25 Calculate Final Total Rise (this video)
- 0:43–1:29 Measure Total Staircase Height (Method 1)
How to Measure Basement Stairs with Uneven Steps
Outline for measuring uneven basement stairs to prepare for leveling or repair. This involves identifying the extent of the unevenness and taking precise measurements of each step's rise and run to plan corrective actions.
Read the full guide Browse all guides
Planning this project? Shop Oak Valley Designs.

Subscribe for exclusive updates
Be the first to know about promotions, new products, and sales.