

Under Stair Storage
About This Guide
This project involves designing and building custom drawers or pull-out carts to maximize storage space within the often-underutilized area beneath a staircase. The process includes measuring the space, designing the storage units, selecting appropriate materials, cutting and assembling the components, and installing them into the stair cavity.
Assembled from 11 on-camera clips by 10 independent creators demonstrating these exact steps.
Tools & Materials
TOUGHBUILT Small Grid Notebooks with 100-sheets, heavy-gauge steel binding and rugged cover, black (3-Pack)
Ornamental Mouldings 1262 3/4 in. x 5 1/2 in. x 96 in. Primed Baseboard Moulding (1-Piece − 0.67 Total Linear Feet)
TOUGHBUILT Small Grid Notebooks with 100-sheets, heavy-gauge steel binding and rugged cover, black (3-Pack)
Ornamental Mouldings 1262 3/4 in. x 5 1/2 in. x 96 in. Primed Baseboard Moulding (1-Piece − 0.67 Total Linear Feet)
Steps

Measure Under-Stair Space
Using a tape measure, record the height, width, and depth of the entire under-stair area. Pay close attention to any angled walls or obstructions that will affect the placement and size of the storage units. Measure at multiple points to account for any irregularities. These measurements are critical for creating a design that maximizes the usable space.

Design Storage Units
Based on the measurements, sketch out the design for your drawers or pull-out carts. Determine the number of units, their dimensions, and how they will operate (e.g., slides, wheels). Consider the type of storage needed (e.g., deep drawers for larger items, shallower ones for smaller items). You can use graph paper for detailed plans or design software if you are comfortable with it. Ensure the design accounts for any sloped ceilings or walls.

Select Materials
Select the type of wood (e.g., plywood, MDF, solid wood) for the construction. Consider the weight of the intended contents when choosing material thickness. Also, select hardware such as drawer slides, casters, and handles. Ensure the chosen materials are suitable for the environment under the stairs, which might have fluctuating humidity levels.

Cut Components
Using a circular saw, table saw, or jigsaw, carefully cut all the pieces for the drawer boxes, frames, and any other structural elements. Ensure all cuts are straight and accurate to ensure a good fit during assembly. If cutting large panels, consider having them cut at the lumberyard to save time and ensure precision.

Assemble Storage Units
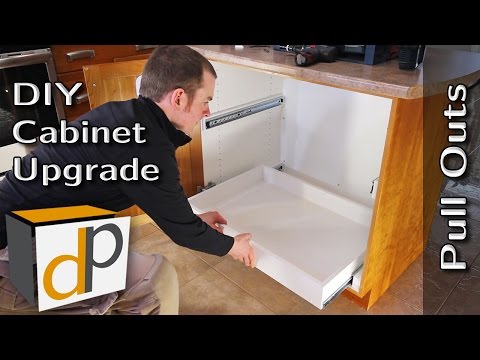
Assemble the drawer boxes by joining the sides, front, and back pieces using screws, nails, and wood glue. Ensure the boxes are square. If building pull-out carts, assemble the frame and attach the casters. For drawers, attach the drawer slides to the sides of the drawers and to the corresponding location within the under-stair cavity or frame structure.
Install Storage Units
Carefully slide the assembled drawers or pull-out carts into their designated positions. If they are built-in, you may need to secure them to the floor or wall framing using screws. For drawer slides that attach to the frame, ensure they are aligned correctly before screwing them in place. Test the movement of each unit to ensure it operates smoothly.
Attach Handles and Finish
Measure and mark the placement for the handles or pulls on the front of each drawer or cart. Drill pilot holes and attach the hardware. If you plan to paint or stain the wood, do so now. Apply primer, followed by your chosen paint or stain, and a protective topcoat for durability. Ensure adequate ventilation during finishing.
Frequently Asked Questions
The project summary lists an estimated time of 4 minutes, but it seems more complex. How long should I realistically expect this project to take?
The 4-minute estimate is likely a typo. Given the design, cutting of plywood, assembly of units, and installation, this intermediate project typically requires several hours to a full weekend, depending on your experience and the complexity of your design. Plan for at least 8-16 hours of work spread across multiple sessions.
What are the most important safety precautions I should take when building under-stair storage units?
Always wear safety glasses when operating cutting tools to protect your eyes from flying debris. Use gloves to prevent splinters, and ensure your work area is well-ventilated if using adhesives or finishes. When installing, securely anchor the units to the studs or solid framing to prevent tipping.
What kind of wood is best for these storage units, and how can I estimate material costs?
For durability and a good finish, 3/4 inch birch plywood, as listed in the materials, is an excellent choice. You'll need to precisely measure your under-stair cavity to calculate the exact amount of plywood, drawer slides, and caster wheels required. Expect material costs to vary, but budget a few hundred dollars depending on hardware quality and wood choice.
How do I accurately measure and design the storage units to fit my unique under-stair space, considering the slope?
Start by measuring the height, width, and depth of your stair cavity at multiple points, as walls are rarely perfectly square. Account for the stair's slope by creating a template from cardboard before cutting your final materials, ensuring your units will slide in and out smoothly without catching.
What are common mistakes DIYers make with under-stair storage, and how can I troubleshoot them?
A frequent mistake is inaccurate measurements, leading to units that don't fit or operate smoothly. Double-check all measurements before cutting and create a detailed cutting plan. If drawers stick, check if slides are level and plumb, and ensure there's enough clearance around the units.
Are there alternative materials or drawer mechanisms I can use if plywood and standard slides aren't ideal for my project?
Yes, for a different look or budget, you could consider solid pine boards for a rustic feel or MDF for painting, though MDF is less durable. Instead of traditional drawer slides, you could build simpler pull-out bins directly on caster wheels, or opt for fixed shelving if full drawer access isn't a priority.
Why are items like 'Designer Stencils' and 'Primed Baseboard Moulding' listed, and how are they typically used in this project?
These items are for aesthetic enhancements. Designer Stencils could be used to add decorative patterns to the drawer faces or the inside of the units. The Primed Baseboard Moulding would likely be used to trim out the exterior opening of the under-stair cavity, giving the installed units a more finished, built-in appearance.
Questions about your project or which product fits? Oak Valley Designs's team is happy to help. Mon–Fri 9–5 ET




Subscribe for exclusive updates
Be the first to know about promotions, new products, and sales.