Attach Stringers to Deck Frame
From Deck Stairs · Step 3 of 8 · Video by decks.com
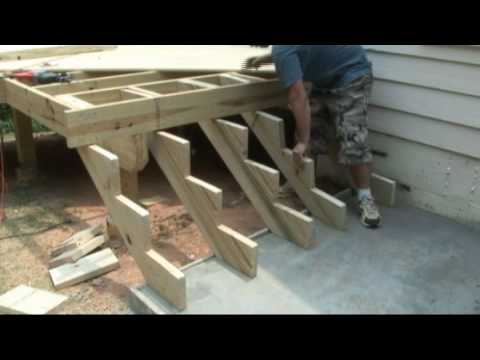
Showing 1:08–1:44 of the source video.
What happens in this clip
There are two primary methods for attaching the cut stringers to the deck frame. For 'inside mount' stringers, position the stringers so that the top riser cut aligns flush with the last deck joist. Then, install horizontal blocking material between the deck joists at the attachment point and securely fasten the top of each stringer to this blocking using nails or screws. For 'outside mount' stringers, you will first need to install a 2x material cleat to the bottom of the deck's rim joist. This cleat acts to extend the attachment surface. Once the cleat is in place, attach the stringers to it using heavy-duty angle brackets and appropriate fasteners. Regardless of the method chosen, ensure stringers are typically spaced 12 inches to 24 inches on center. Always confirm specific spacing and attachment requirements with your local building department, as codes can vary.
Goal: Securely fasten all stringers to the main deck structure using an appropriate method.
What's used
Tools
- 2x Material Cleat
- Angle Brackets
- Blocking Lumber
- Drill/Driver
- Hammer
- Nails
- or securing angle brackets.
About the full video
This project provides a comprehensive, step-by-step guide to constructing and installing deck stairs. It covers initial measurements, calculating rise and run for stringers, cutting the stringers, two methods for attaching stringers to the deck frame, and finally, installing the decking boards for treads and risers.
Step 3 of 8: Attach Stringers to Deck
Align the top of each pre-cut stringer with the corresponding marks on the deck ledger board. Ensure the stringers are flush with the edge of the ledger board. Secure each stringer using appropriate fasteners, such as lag screws or structural screws, ensuring they are driven straight and are long enough to penetrate well into the ledger board and the stringer.
Other videos for this step
Deck Stairs
This project outlines the process of building deck stairs using pre-cut stringers. It covers site preparation, attaching the stringers to the deck, securing them to the ground, and installing treads and railings. Safety is paramount throughout the process, and it's recommended to consult local building codes and consider hiring a professional for complex steps.
Read the full guide Browse all guides
Planning this project? Shop Oak Valley Designs.