
How to build deck stairs - Decks.com
Video by decks.com · 3 moments used in Oak Valley Designs's DIY guides · 2:11 long
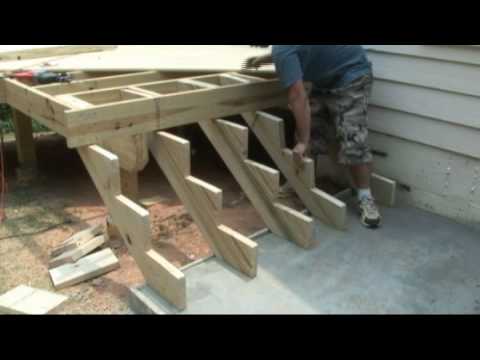
Moments in this video
- 0:19–0:57 Calculate Stair Dimensions and Stringer Type
From How to Lay Out and Cut Deck Stair Stringers, Step 1: Determine Stair Riser Height and Tread Depth
Once the total height is established, determine whether your stair stringers will be 'inside mounted' (attached between joists) or 'outside mounted' (attached to the outside face of the rim joist). Next, use a specialized online stair calculator, such as the one mentioned at decks.com, to input the total height and your chosen run dimension (e.g., 10 1/2 inches). The calculator will output the precise number of stairs required, along with the exact rise and run for each step (for instance, a 7-inch rise and 10 1/2-inch run as shown). Based on your selected stringer attachment style, specific adjustments must be made when cutting the stringer: for inside mount stringers, remove the thickness of the outside joist from the inside of the top rise; for outside mount stringers, remove the thickness of the riser board from the back of the stringer. In both scenarios, the thickness of the tread board should be removed from the bottom of the stringer to ensure the first tread sits correctly on the landing.
- 1:08–1:44 Attach Stringers to Deck Frame
From Deck Stairs, Step 3: Attach Stringers to Deck
There are two primary methods for attaching the cut stringers to the deck frame. For 'inside mount' stringers, position the stringers so that the top riser cut aligns flush with the last deck joist. Then, install horizontal blocking material between the deck joists at the attachment point and securely fasten the top of each stringer to this blocking using nails or screws. For 'outside mount' stringers, you will first need to install a 2x material cleat to the bottom of the deck's rim joist. This cleat acts to extend the attachment surface. Once the cleat is in place, attach the stringers to it using heavy-duty angle brackets and appropriate fasteners. Regardless of the method chosen, ensure stringers are typically spaced 12 inches to 24 inches on center. Always confirm specific spacing and attachment requirements with your local building department, as codes can vary.
- 1:44–2:00 Attach Decking (Treads and Risers)
From Deck Stairs, Step 6: Install Treads
The final step involves attaching the decking boards to create the treads and risers of the stairs. Typically, each tread will consist of two decking courses laid side-by-side, while each riser will utilize one decking course. When installing the treads, it is important to allow for a 1/2-inch to 1-inch 'tread nosing'—the portion of the tread that extends horizontally beyond the face of the riser board below it. Use a drill and appropriate exterior-grade deck screws to securely fasten all decking boards to the stringers.
Guides that use this video
More from the Oak Valley Designs DIY Hub
Read the guide Browse all guides
Planning this project? Shop Oak Valley Designs.

Subscribe for exclusive updates
Be the first to know about promotions, new products, and sales.