

How to Lay Out and Cut Deck Stair Stringers
About This Guide
Outline for laying out and cutting deck stair stringers, including material selection, measurement, layout, and cutting techniques.
Tools & Materials
Calculated Industries Construction Master Pro Desktop with Full Trigonometric Function 44080
FrontLine 18 in. x 18 in. Round White 6-9/16 in. Jamb 4-Lite Grille Geometric Aluminum Clad Wood Window
Calculated Industries Construction Master Pro Desktop with Full Trigonometric Function 44080
FrontLine 18 in. x 18 in. Round White 6-9/16 in. Jamb 4-Lite Grille Geometric Aluminum Clad Wood Window
Steps

Determine Stair Riser Height and Tread Depth
The first step in laying out deck stair stringers is to determine the optimal riser height and tread depth. The total rise is the vertical distance from the ground or landing to the deck surface. Divide the total rise by the desired number of risers to get the riser height. For example, if your total rise is 40 inches and you want 7 risers, each riser would be approximately 5.7 inches. Building codes often specify a maximum riser height (e.g., 7.75 inches) and a minimum tread depth (e.g., 10 inches). It's best to aim for consistency across all steps. The total run (or going) of the stairs is the horizontal distance covered by the treads. The formula for comfortable stairs is often cited as '2 * riser height + tread depth' should be between 24 and 25 inches. Calculate these values carefully to ensure safe and comfortable stairs.
Select Stringer Material
Select the lumber for your stair stringers. Pressure-treated lumber is highly recommended for exterior applications like decks to resist rot and insect damage. Common choices are 2x12 boards. Ensure the boards are straight, with minimal warping or cupping, and free from large knots or cracks that could compromise their structural integrity. The length of the stringers will depend on the total run of your stairs.

Mark the First Stringer Layout
Begin by marking the layout for your stair stringers. Take one of your 2x12 boards and lay it flat. Using your calculated riser height and tread depth, use a framing square to mark the first rise and run. For example, if your riser is 7 inches and tread is 11 inches, mark 7 inches up from the bottom edge, then 11 inches across the bottom edge. Continue this process, creating a series of 'jogs' that represent each step. Ensure your marks are precise. The top of the stringer will sit against the deck ledger or framing, and the bottom will rest on the ground or landing.

Cut the First Stringer
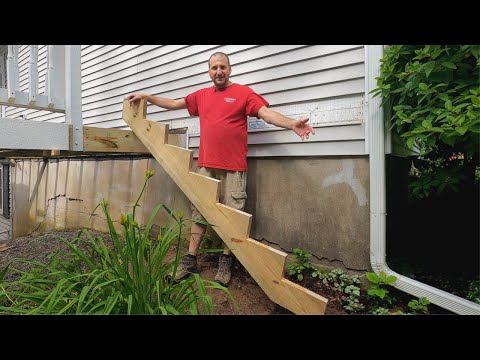
Once the layout is complete on the first stringer board, it's time to make the cuts. Use a circular saw to cut along the marked lines. For the notches (the rise and run), you'll typically make two cuts to remove the waste material. Ensure the cuts are straight and square. The bottom-most cut for the first step (the riser cut) and the cut for the last step (the tread cut) need to be precise. After cutting, you should have a series of notches that will support the treads.

Transfer Layout and Cut Additional Stringers
With the first stringer accurately cut, use it as a template to mark the layout on your other stringer boards. Lay the first stringer on top of a new 2x12 board, aligning the edges precisely. Trace the lines of the first stringer onto the second board. Repeat this for all required stringers (typically two to three, depending on the width of your stairs). Once marked, cut the additional stringers following the same procedure as the first, ensuring all cuts are clean and accurate. Having identical stringers is crucial for stable and level stairs.
Trim the Bottom of the Stringers
The bottom of each stringer often has a triangular waste piece. You need to trim this off to create a flat surface. The amount to trim depends on your specific layout, but it's typically a straight cut across the bottom edge of the stringer where the lowest tread will sit. This ensures the stringer sits flush and supports the first tread properly. Measure and mark this trim cut accurately on all stringers.
Questions about your project or which product fits? Oak Valley Designs's team is happy to help. Mon–Fri 9–5 ET
Related Guides
See All
How to Update Rental Stairs with Removable Carpet Treads
How to Update a Spiral Staircase

How to Put Carpet Treads on Already-Carpeted Stairs

How to Fix Popping Noises from Adhesive Carpet Treads on Wood Stairs

Subscribe for exclusive updates
Be the first to know about promotions, new products, and sales.