
Continue Applying Decals to Remaining Risers
From How to Decorate Stairs for Halloween Safely · Step 3 of 5 · Video by Royal Design Studio Stencils
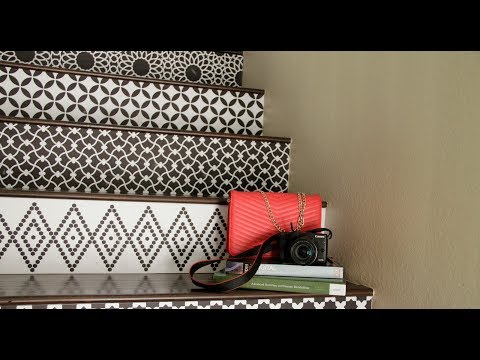
Showing 0:17–0:38 of the source video. Watch the full video with every moment.
What happens in this clip
Follow the same steps of positioning, smoothing with a squeegee, and carefully removing the transfer paper for each of the remaining stair risers. The video demonstrates applying different patterns to create a diverse and visually engaging staircase design. Take your time to ensure precise alignment and smooth application for each decal, working your way up the stairs.
Goal: Repeat the application process for each subsequent stair riser, varying patterns for a dynamic look if desired.
What's used
Tools
- Plastic Squeegee
- Felt-edged applicator
Materials
- Patterned Vinyl Decals (with transfer paper) Wallternatives
About the full video
This instructional video demonstrates how to transform plain stair risers into a decorative feature using pre-cut patterned vinyl decals applied with transfer paper. The process involves preparing the surface, carefully positioning each decal, ensuring strong adhesion with a squeegee, and finally peeling off the transfer paper to reveal the intricate design.
Step 3 of 5: Utilize Stair Riser Decorations
Affix lightweight decorations such as vinyl decals, painted designs, or small, flat cutouts directly onto the riser of each step. Use strong, temporary adhesive like double-sided tape or spray adhesive designed for temporary mounting. Ensure the decorations lie completely flat against the riser and do not extend onto the tread surface.
Every video in How to Decorate Stairs for Halloween Safely
Step 1: Clear Stair Treads
- 0:36–0:41 Clean and Smooth Stairs
- 0:18–0:31 Clean the Stairs
- 0:09–0:45 Prepare and Clean Stair Treads
Step 2: Securely Fasten Non-Obstructive Decorations
- 0:51–1:28 Drape Staircase with Spiderwebs
- 7:00–8:10 Secure Garland with Ribbon Ties
- 0:29–1:35 Apply Decorative Spider Webbing to Staircase Railing
Step 3: Utilize Stair Riser Decorations
- 0:05–0:14 Apply Patterned Decals/Wallpaper to Risers
- 0:17–0:38 Continue Applying Decals to Remaining Risers (this video)
- 6:20–7:27 Add Decorative Stickers to Stair Risers
Step 4: Incorporate Safe Lighting
- 0:06–0:07 Observe Finished Stair Lighting
- 0:14–0:21 Install Stair Tread Lighting
- 0:00–0:19 Install Flexible LED Strip Lighting
Step 5: Perform a Final Safety Walk-Through
- 0:12–0:14 Final Test and Inspection
- 0:28–0:29 Final Inspection and Cleanup
How to Decorate Stairs for Halloween Safely
While decorating stairs for Halloween can be fun, it's crucial to prioritize safety to prevent trips and falls. This outline focuses on safe decoration strategies.
Read the full guide Browse all guides
Planning this project? Shop Oak Valley Designs.

Subscribe for exclusive updates
Be the first to know about promotions, new products, and sales.