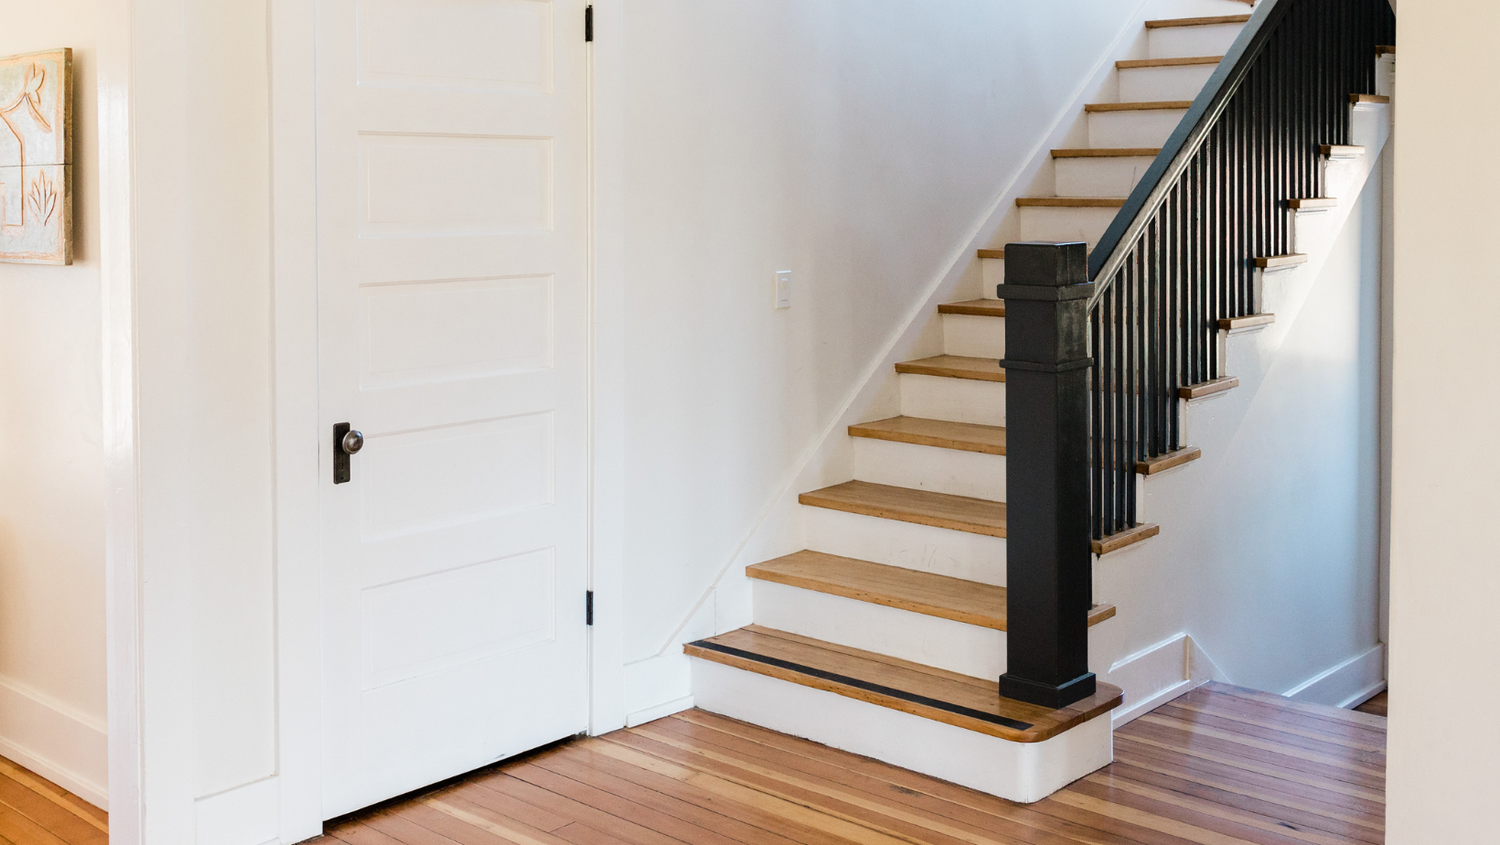
Want to give your staircase a fresh, custom look without hiring a contractor?
Here’s how to make your own stair risers: measure the height and width of each step, select durable materials like wood or MDF, cut them to size, sand the edges for a smooth finish, and install them securely with glue and nails.
It’s that simple.
In this guide, you’ll learn step-by-step instructions, tips for choosing the best materials.
From carpet stair treads to durable hardwoods—and creative ideas to personalize your staircase—whether you’re going for a sleek modern vibe or a classic, timeless look.
How to Make Your Own Stair Risers
Looking to add a custom touch to your stair treads?
Learn how to make your own stair risers with simple, step-by-step instructions for a polished, professional finish.
-
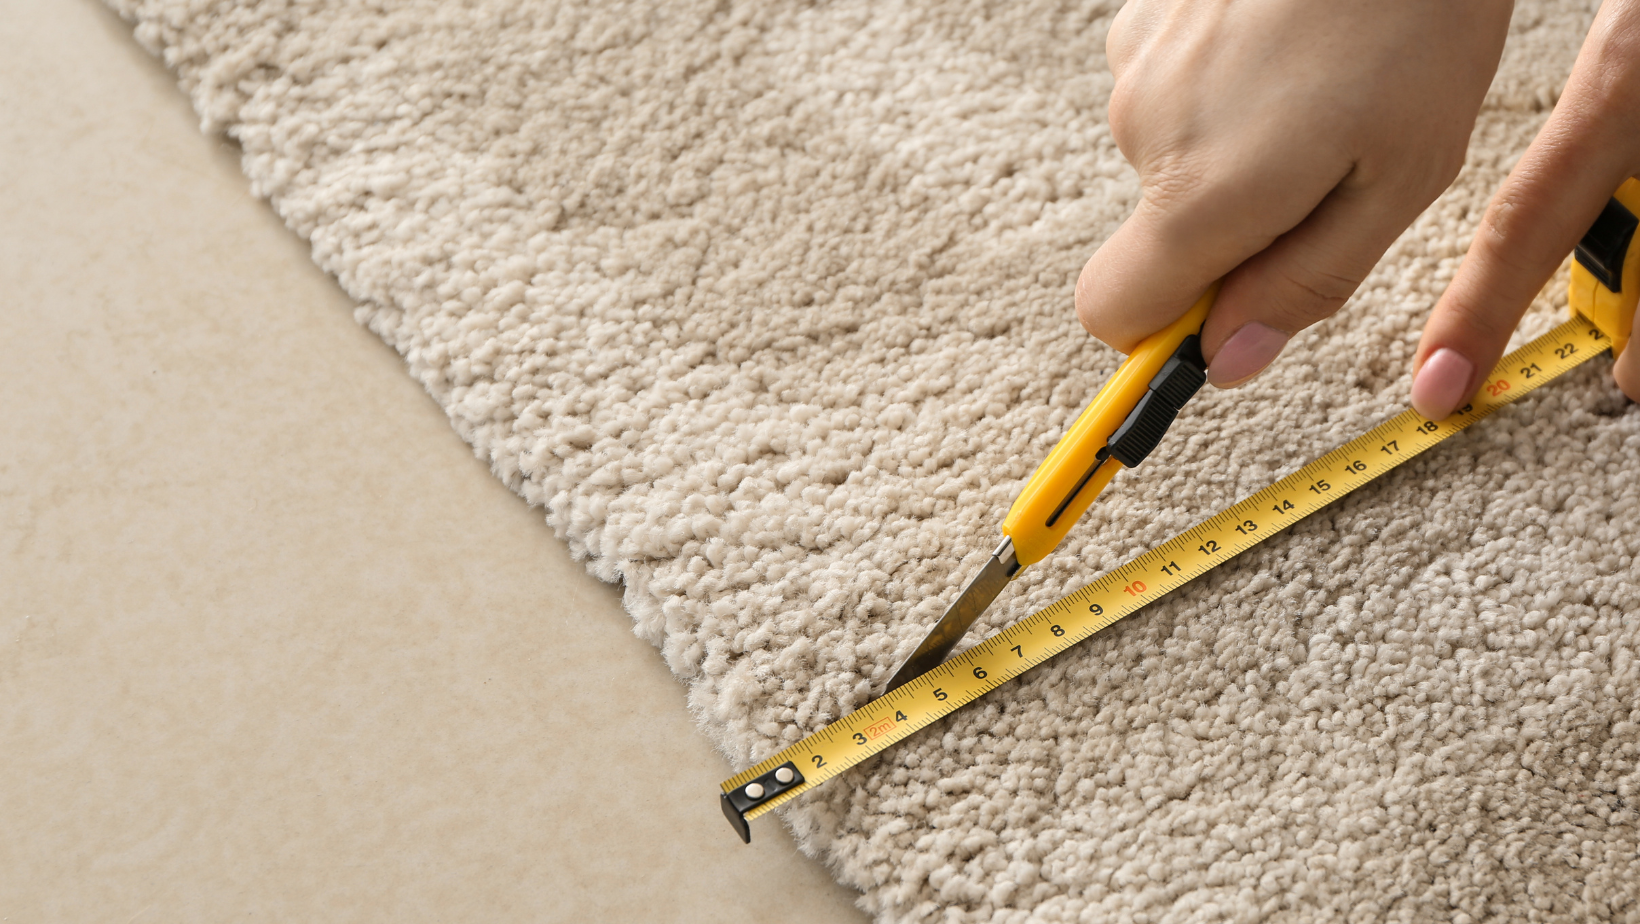
Measure and Plan: Start by measuring the height and width of each stair riser. Most risers are between 7 to 7.75 inches tall, which feels comfortable when walking up and down. Make sure to measure each step individually because older homes might have slight variations in riser heights. Using a level can help ensure your measurements are accurate, preventing uneven steps that could cause tripping hazards later.
-
Select Material: Pick a material that fits your style and needs. Common choices are wood, MDF, and plywood. Each offers different benefits based on cost, look, and durability. If your stairs receive heavy foot traffic, consider using hardwood for its strength and long-lasting finish. For budget-friendly options, MDF is smooth and easy to paint, making it a versatile choice for different design styles.
-
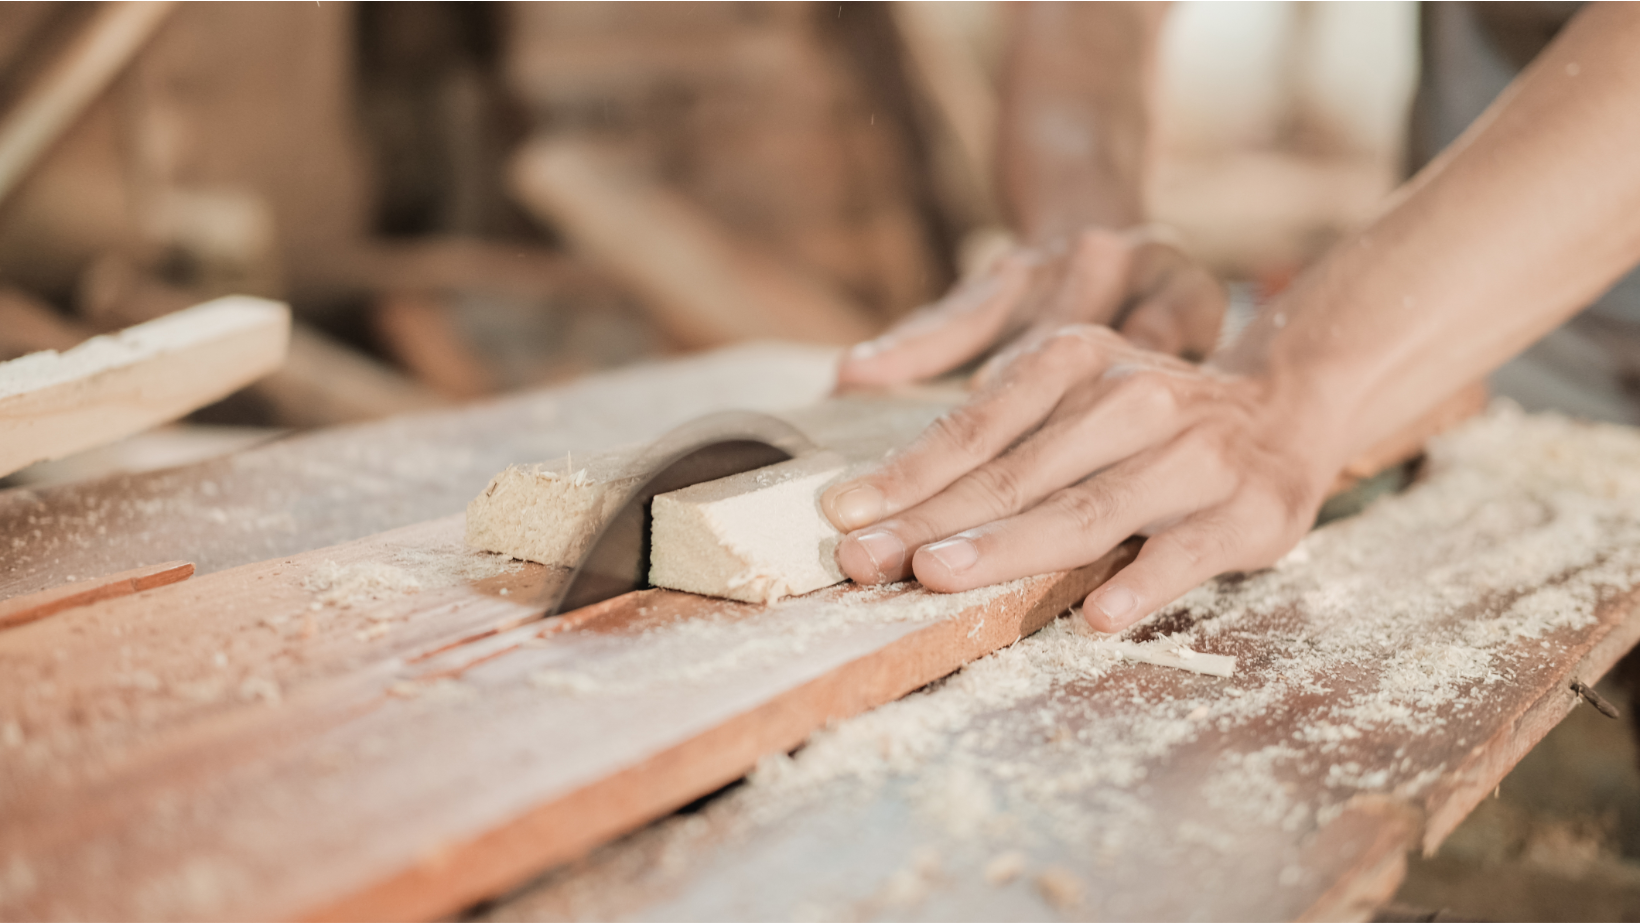
Cut to Size: Use your measurements to cut each riser to the right size. A table saw or circular saw helps make straight, clean cuts. Double-check your measurements before cutting to avoid waste and ensure a perfect fit. It’s also a good idea to mark your lines clearly with a pencil and use clamps to hold the material steady while cutting for precision and safety.
-
Sand and Finish: Sand the edges to remove rough spots and prevent splinters. Apply paint or stain to match your staircase or personal style. For the best finish, start with a coarse grit sandpaper and work your way to a finer grit for a smooth surface. Consider adding a protective sealant if your stairs are in high-traffic areas to prevent wear and tear over time.
-
Install: Place each riser between the stair treads. Secure them with wood glue and nails or screws, making sure they’re tight to avoid movement. Using a nail gun can speed up the process and create a cleaner finish. Check that each riser is level before securing to ensure a professional look and reduce the risk of future adjustments.
How to Make Stair Risers
Making stair risers is about careful measuring and precise cutting.
This ensures each piece fits well and makes your stairs safe and stylish.
Here’s a simple guide: Taking the time to measure correctly will save you from having to redo your work, which can be both frustrating and costly.
Precise cuts also contribute to the structural integrity of your stairs, making them more secure and durable.
-
Measure and Plan: Figure out the height and width of each riser. Aim for a height of 7 to 7.75 inches, which is comfortable for most people. Consistency is key, so use a measuring tape and mark your measurements with a straightedge for accuracy. Remember to account for any flooring material that may add to the riser height, such as carpet or tile.
-
Select Material: Choose materials like wood, MDF, or plywood. Think about durability, cost, and how it matches your home’s design. For a rustic or natural look, reclaimed wood can add character and sustainability to your project. If soundproofing is important, consider thicker materials to help dampen noise between floors.
-
Cut to Size: Cut the risers to the correct size using a table or circular saw. Keep the edges straight and smooth. Always wear safety gear like goggles and gloves when cutting to protect yourself from debris. After cutting, dry-fit the risers in place to confirm the fit before moving on to sanding and finishing.
-
Sand and Finish: Smooth the edges with sandpaper to prevent splinters. Then, paint or stain the risers to fit your style. Use a tack cloth after sanding to remove dust, which helps the paint or stain adhere better. Layering multiple coats with light sanding in between will give you a professional, polished finish.
-
Install: Fit each riser in place and secure it with glue and nails or screws. Make sure they are tight and stable. Use a construction adhesive along with nails for added strength, especially if the stairs are frequently used. After installation, fill any nail holes with wood filler for a seamless look before doing a final touch-up with paint or stain.
What is the Best Material for Stair Risers?
Choosing the right material depends on your budget, design, and how much foot traffic your stairs get.
High-traffic areas require durable materials that can withstand wear and tear over time.
Additionally, consider the ease of maintenance—some materials are easier to clean and repair if they get damaged.
-
Painted MDF or Plywood: Good for a smooth, paintable surface. They are cost-effective and easy to work with. MDF is great for indoor projects since it doesn’t warp easily, but it should be sealed properly to prevent moisture damage. Plywood offers more strength and is less prone to denting, making it a solid option for families with kids or pets.
-
Hardwood: Great for durability and a classic look. You can stain it to show off the natural wood grain. Options like oak, maple, or cherry are popular for their rich appearance and strong resistance to damage. Hardwood also adds value to your home due to its timeless appeal and longevity.
-
Laminate: Perfect if you want a strong, easy-to-clean surface. It comes in many patterns and styles. Laminate is resistant to scratches and stains, making it ideal for homes with pets or heavy foot traffic. Plus, it’s available in designs that mimic real wood without the high cost.
If safety is a top priority, especially in homes with children or elderly family members, consider adding non-slip solutions.
You can even make your own non slip stair treads to pair with your risers, using materials like carpet, rubber, or textured vinyl to provide extra grip.
This not only improves safety but also adds an extra layer of style to your staircase.
What is the Standard Height for a Stair Riser?
Most stair risers are between 7 and 7.75 inches tall.
This height is comfortable and safe.
A uniform riser height helps maintain a natural walking rhythm, reducing the risk of missteps.
Building codes in many areas set strict guidelines for riser heights to ensure safety, so it’s a good idea to check local regulations before starting your project.
Keeping all risers the same height helps prevent trips and falls.
It also makes your staircase look neat and uniform.
Inconsistent heights can cause discomfort when using the stairs, especially for older adults or young children.
Double-check measurements during installation to maintain consistency from top to bottom.
Customizing Your Staircase
When you make your own stair risers, you can add personal design touches.
Here are some ideas: Custom designs can make your staircase a centerpiece in your home, adding both aesthetic appeal and value.
Consider your home’s overall style when choosing decorative elements to create a cohesive look.
-
Carved Designs: Add carvings or cut-out patterns to wooden risers for an elegant look. You can choose from traditional motifs like floral patterns or go modern with geometric shapes. Carved risers can be painted in contrasting colors to make the design stand out.
-
Tile or Mosaic: Use tiles or mosaics for bold colors and eye-catching designs. This option allows for endless creativity, from simple patterns to intricate artwork. Mosaic tiles are also durable and easy to clean, making them both stylish and practical.
-
LED Lighting: Place LED lights under the riser lip for a modern look and better nighttime visibility. LED strips can be motion-activated, providing both safety and energy efficiency. Choose warm white lights for a cozy feel or colored LEDs for a more dramatic effect.
These touches not only make your stairs functional but also turn them into a standout feature in your home.
Personalized details create a lasting impression, reflecting your style while enhancing the staircase’s visual appeal.
Steps to Success
Making your own stair risers is a fun DIY project that adds style and comfort to your staircase.
It allows you to create a unique, custom look that matches your home.
This project is a great way to express your creativity while improving the safety and functionality of your stairs.
Plus, the sense of accomplishment from completing a DIY project adds extra value to your home improvements.
With the right tools, materials, and a bit of creativity, you can transform your stairs into a beautiful and safe part of your living space.
Whether you prefer a sleek modern design or a cozy rustic feel, custom stair risers can help you achieve the look you want.
Don’t be afraid to experiment with different materials and styles until you find the perfect fit for your home.
Ready to Transform Your Staircase?
If you're looking to elevate the style, comfort, and safety of your staircase, Oak Valley Designs is here to help.
Whether you’ve just installed new stair risers or want to refresh your current space, we offer a range of solutions tailored to your needs.
From carpet stair treads that add warmth and grip, to hallway runners and landings that tie your home’s design together, we’ve got you covered.
Let us help you find the perfect fit for your home with quality products designed for both beauty and durability.
Get in touch with us today:
-
Website: https://oakvalleydesigns.com/
-
Phone: 706.331.0315
-
Email: info@oakvalleydesigns.com
-
Address: 30 River Ct SW, Bldg E, Cartersville, GA 30120
Discover how easy it is to create a staircase that’s not just functional, but a beautiful focal point in your home.